[Unpacking alignment cues that seem to go in and out of fashion]
✨✨✨
This month I felt the need to get a little bit more technical. Teaching and practicing in a fair bit of studios for the past ten years, I got to hear a lot of different cues and learn many variations for each Yoga posture. I love the variety! I love learning from different traditions and find out new ways to practice all the time. Some postures, however, seem to be often cued in different and even opposite ways. Here is my insight on four confusing alignment cues.
If you are:
– a beginner Yogi who is only starting to understand how alignment works
– an advanced practitioner who wants to start learning the body in fairer detail
– or a teacher that wants to keep growing and developing precision in cuing technic
Then this post is for you!
✨✨✨
[Image 1: Utanasana Variations]

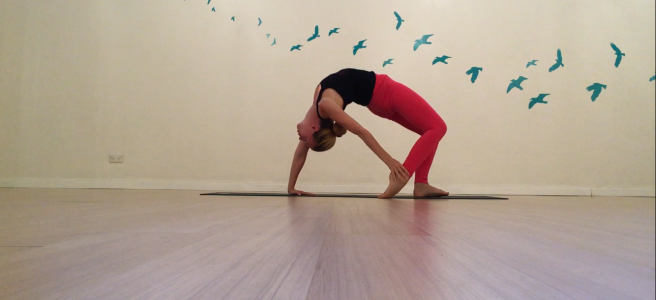
1. Standing Forward Fold (Utanasana) – [Knees straight (image 1, top) or bent (image 1 bottom)?]
Starting my Yoga journey with the Iyengar tradition, I learned to always work with straight legs in a forward fold. Once I finished my first teacher training and started travelling and exploring other Yoga styles, I found that many teachers particularly insist on the opposite cue: knees always bent in a forward fold. So which cue is ‘right’?
Option 1 – Straight Legs: It is important to notice that ‘straight legs’ in Yoga actually means ‘soaking’ the kneecaps towards the hips and not only ‘locking’ the knees in. When the knees are soaked in and up, the thighs are engaged, the backs of the legs are stretching and the back can relax on top of the legs. I often cue this variation in the following way: ‘the legs are working strong, they are like a solid rock from which the back can drop down like a waterfall’.
Option 2 – Bent Knees: When the knees are bent, the posture will feel more passive and relaxed. It is a great variation for a resting pose! Also, when the knees are bent, it is easier to lengthen the spine and create more space in the back. This variation is not wrong; it just redirects the focus of the posture from the legs to the upper body. You might have tight hamstrings which would mean that physically, you can’t yet straighten your legs; in this case, this is the only variation available at this stage of your practice.
My Insight: I can tell from my experience that working with straight legs consistently for the first five years of my practice, transformed and healed my knees. Having a background in competitive martial arts, I often suffered from continuous pain in my right knee. Soaking the knees helped me strengthen my thighs and knees and improved my posture. I still casually experience discomfort in my knees and coming back to traditional practice of Utanasana with straight legs always helps.
Flowing through a dynamic Vinyasa class, it might be challenging to straighten the knee properly; there is a concern that in the fast pace you will accidently lock the knees or wont be careful in your transition from the forward fold to other postures, in this case, injury is possible. My rule is to always offer bent knees as a modification, presenting straight legs as the full variation of the posture. When the posture is held statically for at least few breaths, I would encourage a student to prioritize straight legs and use the full potential of the posture (if, of course, he has the flexibility to soak his knees in a forward fold with reasonable ease).
✨✨✨
[Image 2: Bhujangasana Variations]

Cobra Pose (Bhujangasana) – [Hands on the mat (image 2, top) or floating (image 2, bottom)]
If you look at a Yoga asana text book or google images of the traditional pose, the palms will always be depicted as pressed to the mat, however, almost in every single Vinyasa class I’ve practiced, I was cued to float the palms of the mat. What would make a better pose?
The most common mistake when practicing a back bend is using the lumbar spine or the lower back more than the upper vertebrae. The middle/lower section of the spine is usually more flexible and thus more susceptible to straining and injury. It takes a lot of time though to teach the body to bend through the upper spine! particularly through the space in between the shoulder blades. Don’t be too hard on yourself if you still feel the lumbar in a back bend more than anything else; start from smaller bends and try to travel with your attention up the spine.
Option 1 – Palms Pressed Firmly To The Mat: Grounding through the palms helps to recruit the shoulders and shoulder blades into the posture and redirect the focus from the lumbar spine. When the arms are pressed, the upper body is automatically engaged. This movement, however, requires some strength in the arms.
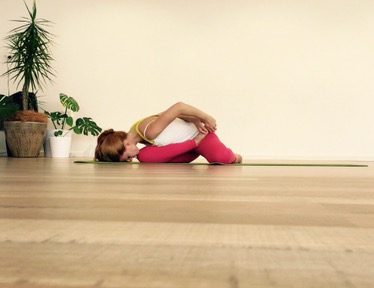
Option 2 – Palms Floating: I often hear the explanation that floating the palms helps the practitioner to use his back rather than his arms to perform the bend. It is important to notice which part of the back is used though! When the palms are floating, it is more challenging to engage the upper spine as there is no assistance from the arms. Usually, if we don’t lose the focus on the space in between the shoulder blades, the bend in this variation will be smaller. When the variation held properly the chest will be lengthening more forward than up (like in Locust pose, Shalobasana, image 3).
[Image 3: Shalobasana]

My Insight: Personally, I hate practicing Cobra with floating palms! Having an over-flexible lumbar, I just always prioritize focusing on the curve in my upper spine when holding a back bend. When I work with floating palms, I prefer to call the posture: a variation of Shalobasana, Locust. In Shalobasana we focus on lengthening forward with the chest, more than lifting it up (I often cue to imagine the body extending to two different directions, creating a canoe boat shape, rather than lifting the legs and arms up like a ‘Titanic’). In Cobra, we can lift the chest higher, engaging the upper spine and the shoulder blades, as well as using the strength of our arms.
✨✨✨
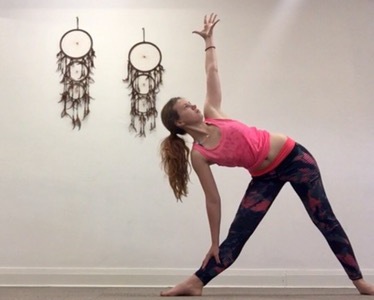
[Image 4: Triangle Attempts]

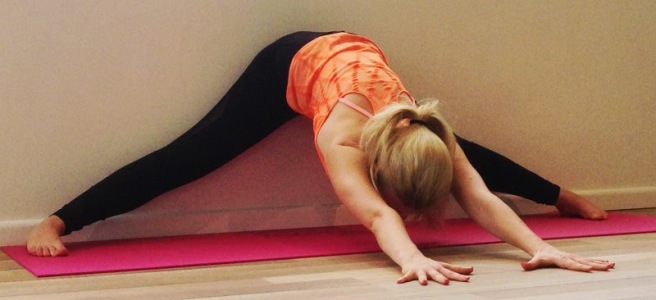
Triangle Pose (Trikonasana) – [What do we do with our hips?]
Triangle pose is challenging for all levels of practitioners. The better you get to know your body, the more you will notice how imperfect your triangle is. On the left side of image 4, I am demonstrating my attempts at Trikonasana. It looks like my hips are getting there, being quite even but my waist is still shorter at the bottom.
Here I want to focus on the alignment of the hips in the pose. I hear a lot of cues such as: ‘bumping’ the hips to the side, shortening the stance to not over stretch the thighs, or even closing the back hip in rather than externally rotating. This is all due to several occasions of straining through the groins or hips while trying to ‘roll the front hip joint under’, as traditionally cued. I am not sure about the accuracy of that… I practice my Trikonasana traditionally for years, and never seen anyone injured by it. The posture is all about this external rotation in the hips, so I believe that if a student has a particular condition that doesn’t allow this rotation, he might prefer to avoid the pose entirely, rather than practicing it wrong.
The most common mistake I encounter in this pose, is still what I demonstrate (and exaggerate) on the right side of image 4, sticking the butt out and leaning too much forward in order to reach lower down. This can be avoided only by attempting to keep the hips even and externally rotated. It is a bit of a practice for the ego… The more I understand my Triangle in fair detail, the higher I stay in the pose; my posture becomes more contained, though not at all less deep or strong.
Good Tips For Your Triangle Would Be:
1. Ground the outer edge of your back foot to open your back hip.
2. To open your front hip: press your front shin against your palm and/or (if you don’t reach) squeeze your front glute in, to pill your groin forward.
3. Extend the waist as evenly as possible, pulling the arm pits away from the groins.
✨✨✨
[Image 5: Utkatasana Variations]

Chair Pose (Utkatasana) – [Lean forward (image 5, left) or hold the spine upright (image 5, right)]
Maintaining a tall spine may sound like a basic cue but it is actually very difficult. Lengthening the spine to its full potential requires: the tailbone to be tucked under, the shoulders to be drawn down and back, the shoulder blades to be pressed in and down, the core to be slightly engaged… And the list goes on as more sensitive and detailed your practice becomes.
Option 1 – Lean Forward: When we lean forward our lumbar spine tends to relax and lengthen automatically. This variation is less challenging for the back and allows a deeper squat, strengthening the thighs.
Option 2 – Upright: When the spine held upright, or as upright as possible, the back must work much harder. It is much harder to squat low and have the weight distributed evenly throughout the feet while attempting to maintain a tall seat. It is a challenging pose but a great exercise to teach the body to lengthen the spine.
My Insight: My priority is usually working on my back in this posture, so upright will be my choice. Building up correct alignment of the back in chair sets foundation to have similar form in goddess pose, lounge and other similar postures. The deeper the bend in the knees, the harder it is to keep the spine tall and upright. This is a matter of balancing two opposite movements in the body at the same time.
✨✨✨
You don’t have to agree with all of my insights; what you take from your practice will always depend more on you than on any teacher you will choose to follow. Teachers are only there to guide you through your own practice and help you find your own path.
Most important is to remember that there is more than one way to practice a posture and as you get more involved with your Yoga practice, you also develop more interest in learning all the details of alignment. When you start to understand your body better, you develop higher sensitivity and intuition, then your experience of practice becomes more fulfilled.
Eventually, when you are attentive and mindful enough in your practice, you can enjoy all different variations of a pose and you not at all need to stick to one tradition or style. There is really not much you can do wrong in Yoga! Injuries rarely happen because of wrong posture or technique in a basic class; from my experience, it is much more common to get injured when attempting something very complicated, practicing without a proper warm up or simply taking a clumsy step. But it always helps to have some order in things you are passionate about learning.
I hope my blog clarified few principles of alignment for you. If you learned something new, please apply those cues in your practice and share the love when teaching your students!
Namaste🙏